Table of Contents
Making rock candy is a delightful intersection of culinary art and science. It is a process that transforms simple household staples—sugar and water—into sparkling, edible crystals through the natural process of crystallization. This recipe is not only a sweet treat but a fascinating experiment in patience and chemistry.
Ingredients and Measurements
The beauty of this recipe lies in its simplicity. It follows a basic ratio that can be scaled up or down depending on how much candy you wish to make:
- 1 Part Water: For a standard batch, use 1 cup of water.
- 3 Parts Sugar: Use 3 cups of white granulated sugar.
- Food Coloring and Flavoring: A few drops of your choice to add personality to your crystals.
- Seed Crystals: Extra granulated sugar for coating the sticks.
Equipment Needed
- Popsicle sticks, bamboo skewers, or string.
- Clothespins (to hold the sticks in place).
- Glass jars (mason jars or tall glasses).
- A saucepot and a wooden spoon or spatula.
The Scientific Process: Step-by-Step
1. Preparing the Seed Crystals
The first and most crucial step is creating “seed crystals.” Dip your stick or string into water and then roll it in dry granulated sugar. This provides a foundation for the dissolved sugar in the solution to latch onto and grow. Crucially, let these sticks dry completely before moving forward.
2. Creating the Supersaturated Solution
Bring the water to a simmer in a pot over high heat. Gradually add the sugar one cup at a time, stirring until completely dissolved. The goal is to create a “supersaturated” solution—where the water holds more sugar than it normally could at room temperature. Once the liquid is clear and begins to boil with large bubbles, remove it from the heat. At this stage, you can stir in your food coloring and flavor extracts.
3. The Cooling Phase
Allow the sugar syrup to cool for about 20 minutes. Pour the solution into clean glass jars. Carefully lower your sugar-coated stick into the jar, using a clothespin to suspend it. Ensure the stick is about 1 to 1.5 inches off the bottom of the jar to prevent it from getting stuck as crystals grow on the floor of the container.
4. The Growth Period
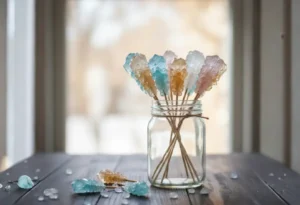
Place the jars in a quiet area where they won’t be disturbed. Over the next 5 to 7 days, the sugar will slowly come out of the solution and crystallize onto your seed stick. You will notice a hard “crust” of sugar forming on the surface of the liquid; this is normal and helps protect the growth beneath.
Final Harvest and Troubleshooting
After a week, gently break the top crust and lift your candy out. Let the rock candy hang over an empty glass to drip dry for 3 to 4 hours.
Pro-Tips for Success:
- Temperature Control: The size of the crystals is determined by how slowly the liquid cools; slower cooling generally leads to larger, more defined crystals.
- Avoid the Bottom: If your stick touches the bottom, it may become “glued” to the jar by crystal growth.
- Reuse: If your first attempt doesn’t grow well, you can reheat the liquid, add a bit more sugar, and try again with a fresh seed stick.
This homemade rock candy is a lesson in patience, resulting in a beautiful, crunchy confection that is as much a visual marvel as it is a nostalgic treat.